Introduction to Enums in Swift

Welcome to another installment in the Beginner Swift series! If you don't have any familiarity with Swift, yet, I would highly recommend checking out the other posts in my Beginner Swift series before starting in on this one. If you've already gone through those posts, or already have familiarity with Swift, and want to learn more about Enumerations and how you can use them in your projects, this is the post for you. Let's get started!
Enumerations - What are they?
For those of you who are familiar with my posts, you'll know that I like to make references to documentation. If we look at the official Swift documentation on Enumerations, we can see that an enumeration, or enum for short, "defines a common type for a group of related values and enables you to work with those values in a type-safe way within your code." Cool, makes perfect sense, right? You can now go use them and don't need my help. Well, maybe not quite. So, in basic terms, what is this definition telling us? We can glean from the definition that this is some kind of grouping. Okay, that's cool. Have we seen other kinds of logical groupings before? As a matter of fact, we have. Remember classes and structures? Those are kinds of groupings. So it stands to reason we'll create enums in a similar fashion. Let's look at an example to make this more clear. We're going to use this enum in a future Swift Tips post, but you can get a sneak peak right now. Don't worry if you aren't entirely clear on what each of the cases are meant to do right now, that'll become clear in my next Swift Tips post.
If you haven't done so already, launch Xcode. Create a new playground file and add the following to it:
enum HTTPMethod {
    case get
    case put
    case post
    case delete
}
Again, don't worry if you don't understand what a get, put, post, or delete means, just focus on the syntax for creating an enum. Just like a struct or a class, we create our enum by using a Swift keyword (enum), giving it a name (HTTPMethod), and using a set of {} to put all the code we want to be contained in the object. The main difference you can see here is the use of case. We use cases to specify the different values we want in our enum.
What's really cool about enums is they allow us to define a specific set of options we want to use (or have our users use) in our programs. If you've ever worked with a drop-down menu on a website or in Excel, the concept is exactly the same. Say you are making a Kanban board kind of app and you wanted to restrict the options users could set for each task to Not Started, In Progress, In Review, and Done, how could we do that? This is a perfect use-case for an enum and would provide the data for a PickerView (more on picker views in a future post). Can you think of how to translate those options into an enum?
enum TaskOptions {
    case notStarted, inProgress, inReview, done
}
Oh yeah, did I forget to mention you can declare all your options in just one line? Just another cool feature of enums.
Another handy use for enums is you can assign the types of variables or constants you create to enums. If that doesn't make sense, maybe an example will help. Continuing with our TaskOptions enum, add the following to your playground file:
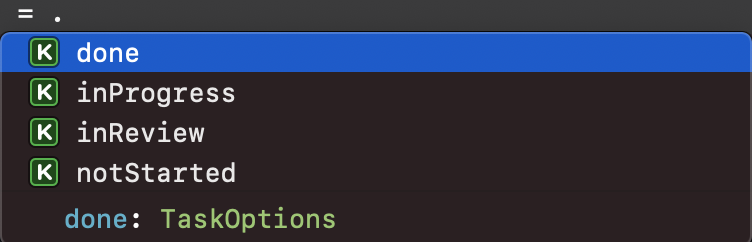
let task: TaskOptions = .done
In the above line, we are specifying that the type of our task constant is TaskOptions. That allows us to use dot syntax when specifying the value of our task constant. This is where the type-safety we saw in the definition come into play. When you hit the . button, you only get the options that are defined in the enum, no opportunity to use something that won't work. After clicking the ., you should see in the dropdown that all of the TaskOptions appear:
This ensures that anyone who creates a task will only have those options to choose from. If these tasks are being populated to a database, we won't have to worry about cleaning our data later for done, Done, or DONE; all the data will be formatted the exact same way. Trust me, the data people on your team will love you if you prevent those kinds of data discrepancies from happening in the first place.
Specifying Underlying Values
Sticking with our TaskOptions enum, we're going to make some changes to it to illustrate how we can specify default, or raw values. Change TaskOptions enum to the following:
enum TaskOptions: String {
    case notStarted = "Not Started"
    case inProgress = "In Progress"
    case inReview = "In Review"
    case done = "Done"
}
You can see, we are now specifying that we want our underlying values to be of type String. We are then assigning raw values to each of our cases. Right outside your TaskOptions enum, add a print to see the value of the notStarted case:
print(TaskOptions.notStarted)
What do you see get printed? Is it what you expected? You should see that notStarted gets printed. That doesn't look so great, right? Especially if we were to show that text to a user, we don't want to show them that. So, how do we access the value that we just set? You need to specify that you want the .rawValue from your enum case. Change your print statement to the following:
print(TaskOptions.notStarted.rawValue)
Now what do you see? You should see Not Started is getting printed. That's much better. Specifying your own raw values can be a great way to set your own styling and present your case values exactly how you choose.
Wrap Up
And there you have it! Your first look at creating and using enums in Swift. Go ahead and come up with some enums of your own to practice what you just learned. How would you create an enum for months in the year? What happens when you use Int instead of String as your enum's type? Reading the documentation, then experimenting for yourself is the best way to solidify your learning.
Happy coding!


