Introduction
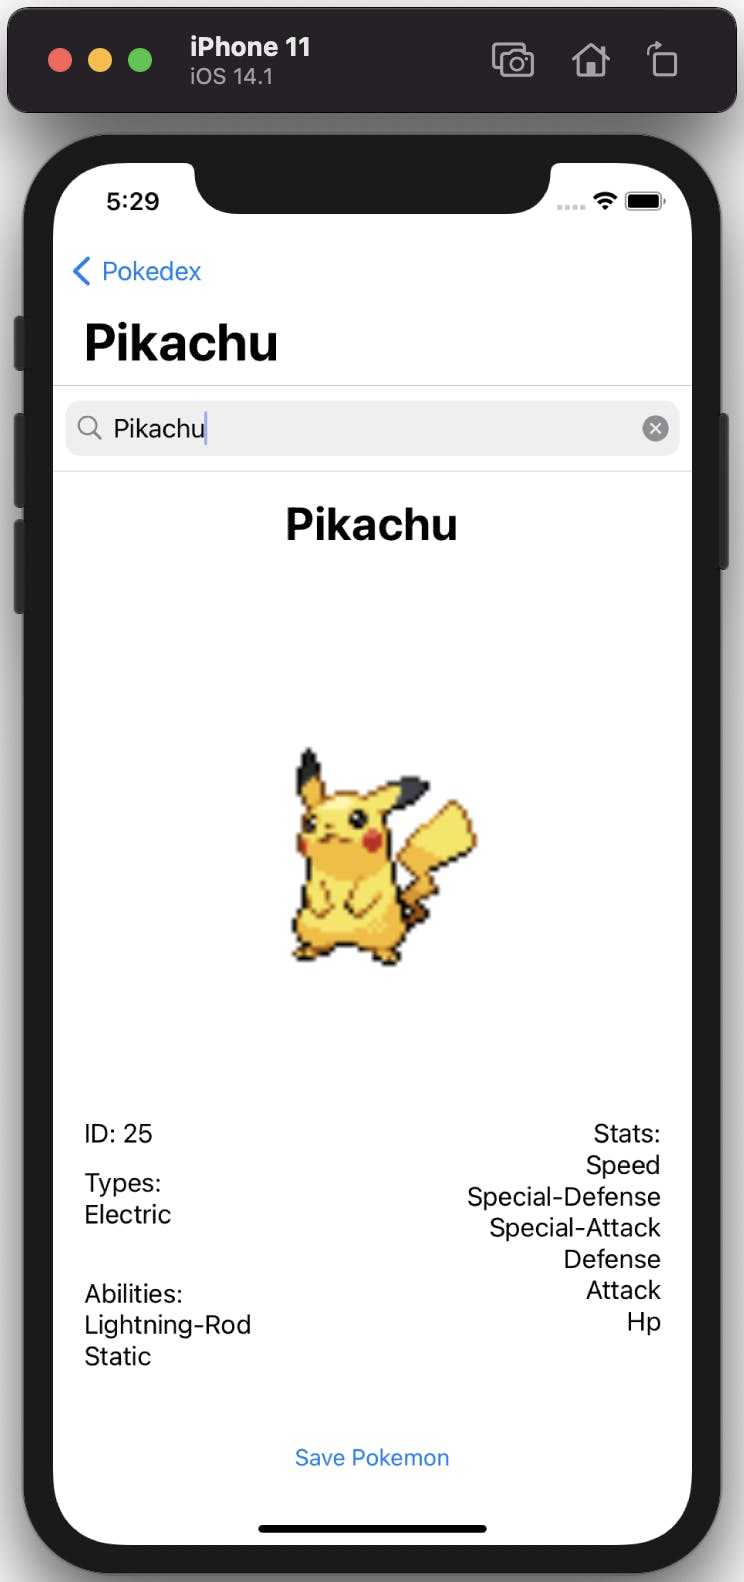
Welcome to a brand new series! In this Pokédex App Series we're going to build a fully functional Pokédex. Before we start working, let's take a look at what our end result is going to be. I might change some details around here-and-there throughout the course of this series, but the overall look will be roughly the same:

In order to get all the details of the Pokémon that will make our Pokédex function, we'll be connecting our app to the PokéApi. If you read my Making an API Request in Swift post, this API should be very familiar to you, as we used it in that post to learn about networking. If you haven't seen it already, I recommend you check it out. Much of the networking code that we need for this app was already covered in that post.
For those of you who haven't seen that post, we're going to focus on the Pokemon section of the PokéApi's documentation. Here is what we can expect to receive from a GET request that we make to the API:

We're going to use a bunch of these fields, but feel free to choose the fields you want to use as you build out the app.
Setting up the Project
In the Contacts App series, I showed you how to create your very first iOS application using Interface Builder and Storyboards. In this project, I want to show you a different way to set up your user interface. We are going to build this project's UI programmatically. In other words, we'll make the entire app just using code! If you're coming from Interface Builder, this will take some getting used to. I promise, it is worth learning how to build your UI all in code. It makes collaborating with other team members much easier and is a common way of creating UI that you should be familiar with.
If you haven't already, open up Xcode and create a new project. I'm going to call mine Pokedex. In order to make our UI completely programmatic, there are a few things we need to do.
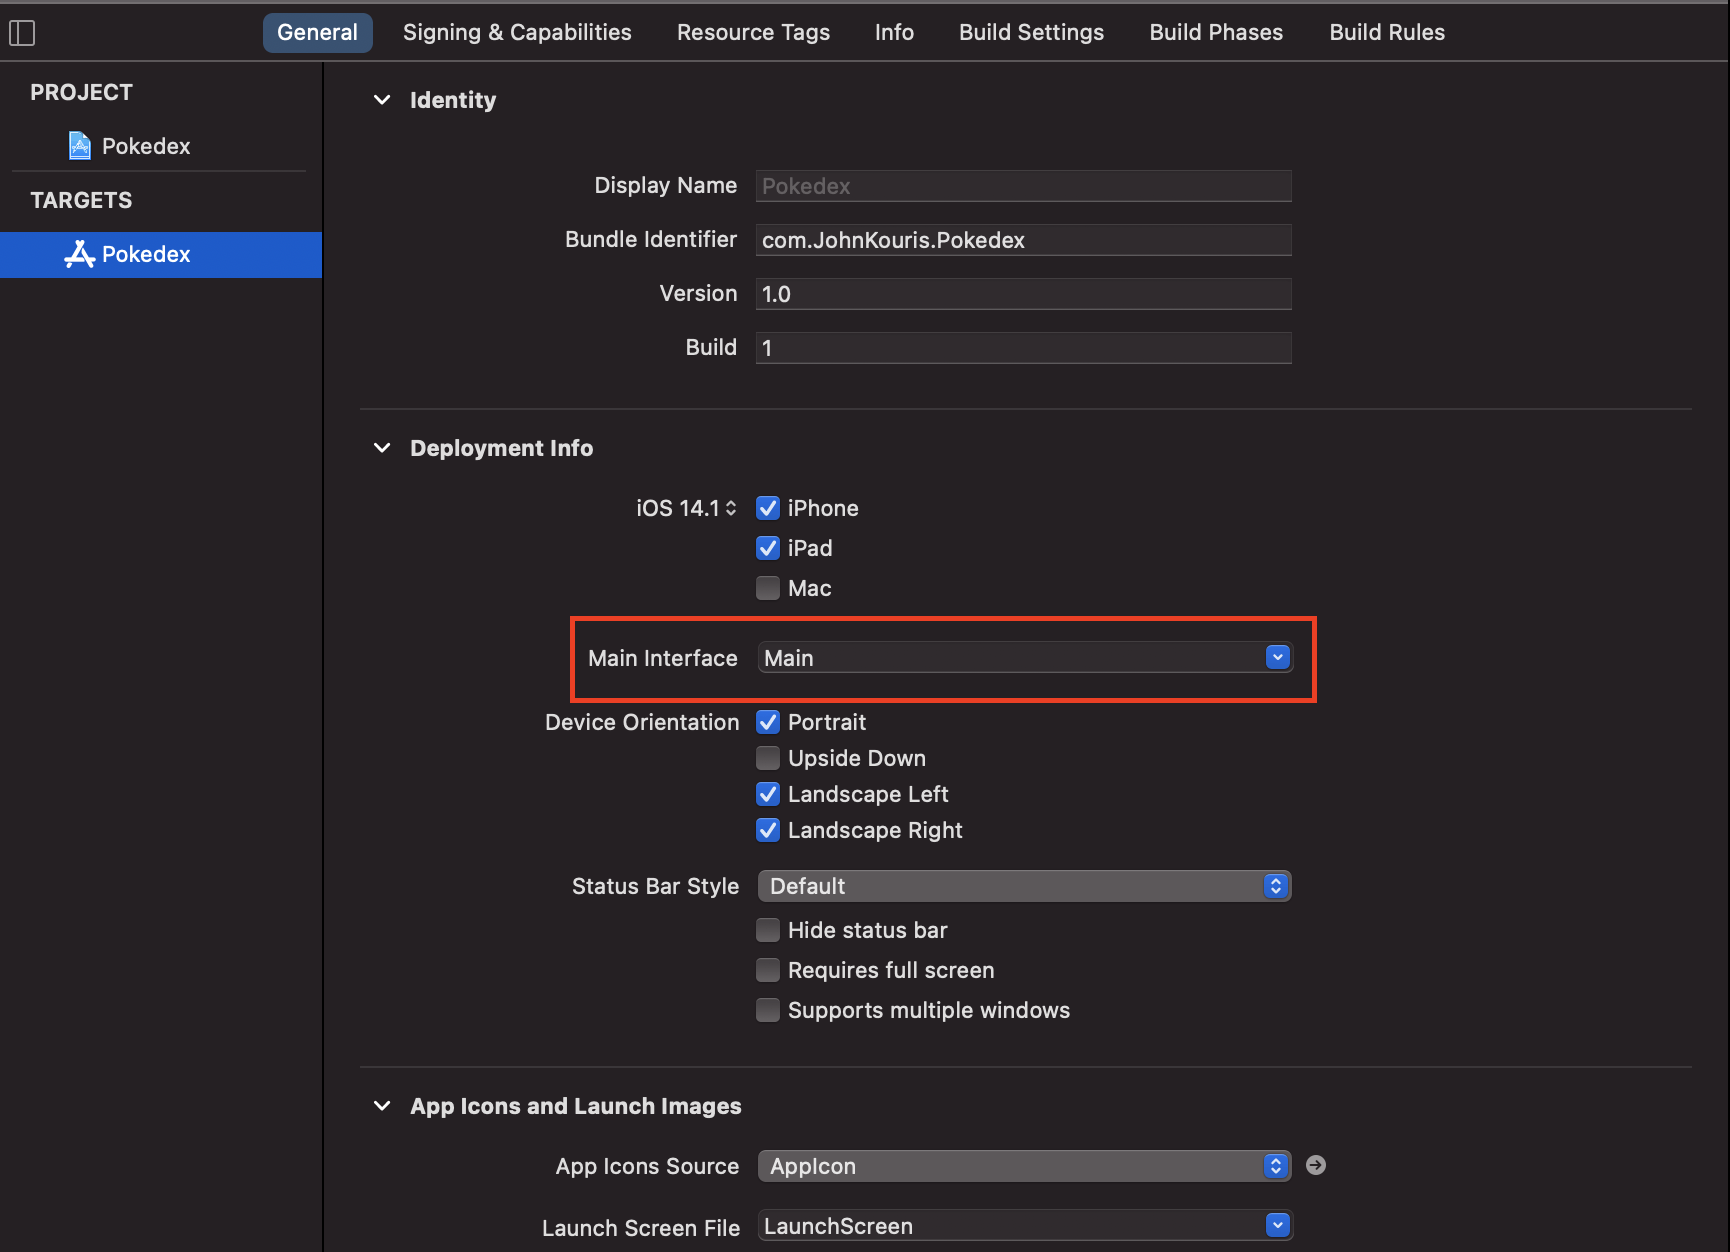
First, in the General tab of the Pokedex target, you should see a setting for Main Interface like below:

Go ahead and delete Main from that field (be sure you press return to make sure the change is persisted). This will tell the project that we won't be using the Main.storyboard file for our UI.
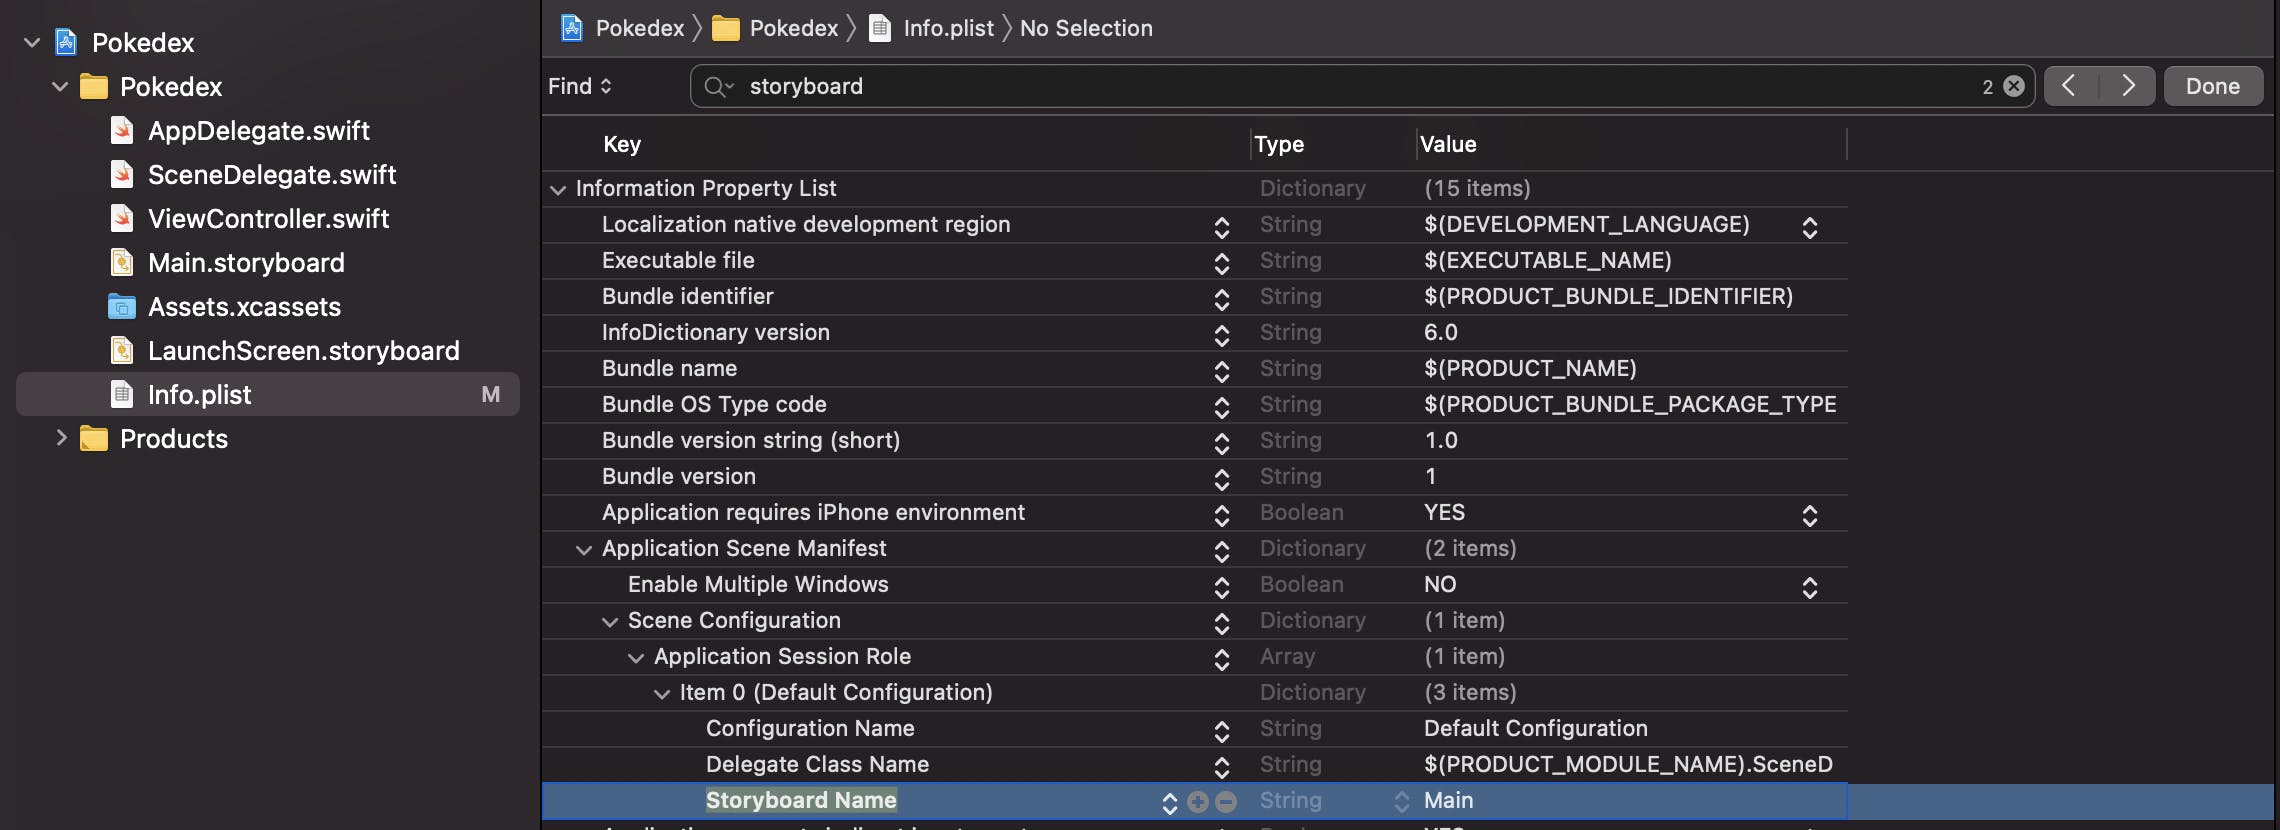
Next, we need to remove Main from our Storyboard Name setting in the Info.plist file. Go ahead and select your Info.plist in the project navigator. Search (command + f) for the word storyboard in the file. You should see this row appear:

Go ahead and delete this row by pressing on the minus or by clicking the delete key.
Finally, we need to tell our app what screen we want to display when the app loads. Open up your SceneDelegate.swift file and find the willConnectTo method (it should be the first in the file). Go ahead and remove all the code from inside that method so you are left with the following:
func scene(_ scene: UIScene, willConnectTo session: UISceneSession,
options connectionOptions: UIScene.ConnectionOptions) {

}
We are going to use this method to attach a scene to the window of our application. If that doesn't make much sense, don't worry. In practical terms, all this means is we're going to tell our app which screen to show when the app launches. Add the following code inside the willConnectTo method:
guard let windowScene = (scene as? UIWindowScene) else { return }

window = UIWindow(frame: windowScene.coordinateSpace.bounds)
window?.windowScene = windowScene
window?.rootViewController = ViewController()
window?.makeKeyAndVisible()
Let's look at what we're doing in these five lines:
- Create a new
windowScenewhich will manage the window for our app - Set the frame of the
windowto be the full space of the device's screen - Set the
window'swindowSceneto thewindowScenewe created in step 1 - Set the
window'srootViewController(the view controller we want to display when the app loads) to an instance ofViewController()that was created for us when we started the project - Call
makeKeyAndVisible()on thewindowto display the window to the user
If you were to run the app now, all you'd see is a black screen. To test that this is working as expected, go to your ViewController.swift file and add the following line inside your viewDidLoad() method:
view.backgroundColor = .blue
This will set the background color of the view controller to blue. Run your simulator and verify that your screen appears blue.
Wrap Up
Congratulations! You've just set up your very first, fully programmatic app. In the next post, we'll set up our data model and create our networking class that will handle the communication between our app and the API.
Happy coding!
