Making Your First iOS App - Part 4

Welcome to the final part in the Contacts App series! In this last post in the series, we're going to persist the changes users make to the contact list across subsequent launches of the app. You may have already heard of some of the different methods you can use to persist data in iOS. For this project, we are going to use Core Data to persist our data for the contacts app.
Before we start implementing Core Data, I want to give you a basic overview of what Core Data is and why we use it. If you've been working through the Contacts App series up to this point, you'll know that we can add and delete contacts from our list of contacts. But when we relaunch our simulator, none of the changes we made have persisted. Why is that? As our app works right now, every time we launch, we are resetting our contact list to the static contacts array. We haven't told our app that we want our changes to be saved. And that's where Core Data comes in.
Core Data represents one of many different ways we can save data to our device. Some of those methods include:
- writing to disk
- publishing to iCloud
- UserDefaults
- iOS Keychain
- Firebase
- Realm
- and of course, Core Data
You may have heard that Core Data is confusing or difficult to implement. And during its early days, that was true. However, you'll be happy to know that with each release of a new iOS operating system (now on iOS 14), the team at Apple has made Core Data easier and easier to implement. My hope with this post is that I can make your introduction to Core Data as simple and easy to understand as possible. And to put that knowledge to use, we'll be adding Core Data to our existing project. But first, let's walk through the different pieces that make up Core Data.
Core Data Overview
At a very basic level, Core Data functions as an abstraction layer that makes it easy for developers to save data to devices, without having to understand all the fine details that come with administering a database. The basic Core Data stack - the set of classes needed to make Core Data work - is made of four pieces:
- The persistent container
- The model
- The context, and
- The store coordinator
That's it! I know it may sound like a lot, but in practice it really is quite simple. If we take a look at the Apple documentation we can see how each of these pieces is connected and what each class is responsible for doing. Let's look at how these four are related:
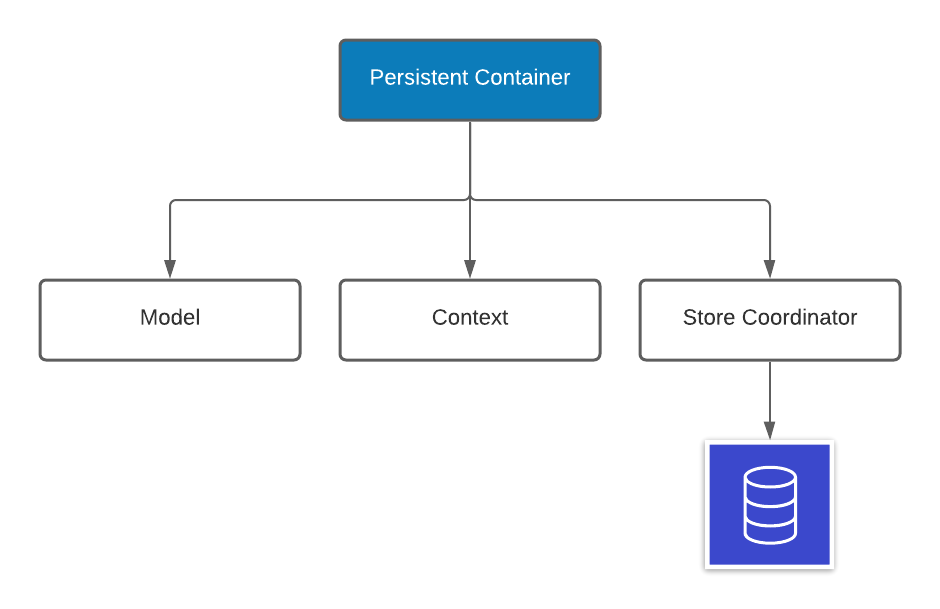
Not so scary right? Let's look at what each of these pieces do:
- The Persistent Container is responsible for setting up the other pieces of the Core Data Stack. This one class sets up your model, the context, and the store coordinator all at once.
- The Model represents your app's model file that will describe the kinds of types, attributes, and relationships that each model will have.
- The Context is the class responsible for tracking changes made to managed objects before those changes get saved.
- Finally, the Store Coordinator is responsible for saving and fetching your managed objects from the data storage.
I understand that this may sound like a lot to keep track of, but I promise, implementing them is not hard. And that's exactly what we're going to do now in our Contacts app.
Implementing Core Data in the Contacts App
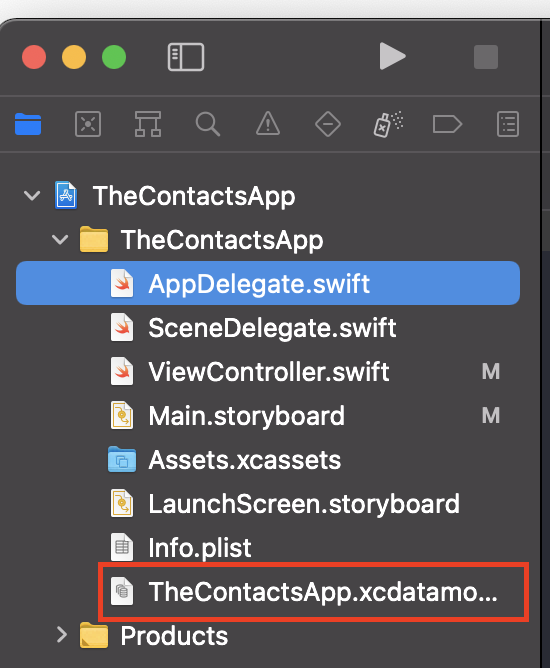
You may or may not remember this, but when I first created my app project back in part 1, I had a blue check mark in the Use Core Data section. If you created your project with this option selected, you already have everything needed to get started and can go ahead and skip to the Defining our Model section. But before you do, make sure you have a .xcdatamodel file in your Documents Outline in the left-hand side of the screen. In my case, this file is called TheContactsApp.xcdatamodel like seen below:
If you don't have this file, or you're just curious about the manual setup, don't worry. I'm going to walk you through how to get Core Data up and running from an existing project that doesn't have it. And it is a very simple, two-step process. We're going to:
- Add the
xcdatamodelfile to our project - Update our
AppDelegate.swiftfile to create our Core Data Stack.
Adding Core Data to an Existing Project
First, to create a new file, go to File -> New -> File... or simply click command + N to bring up the file template window. Scroll down to the Core Data section. It should look like below:
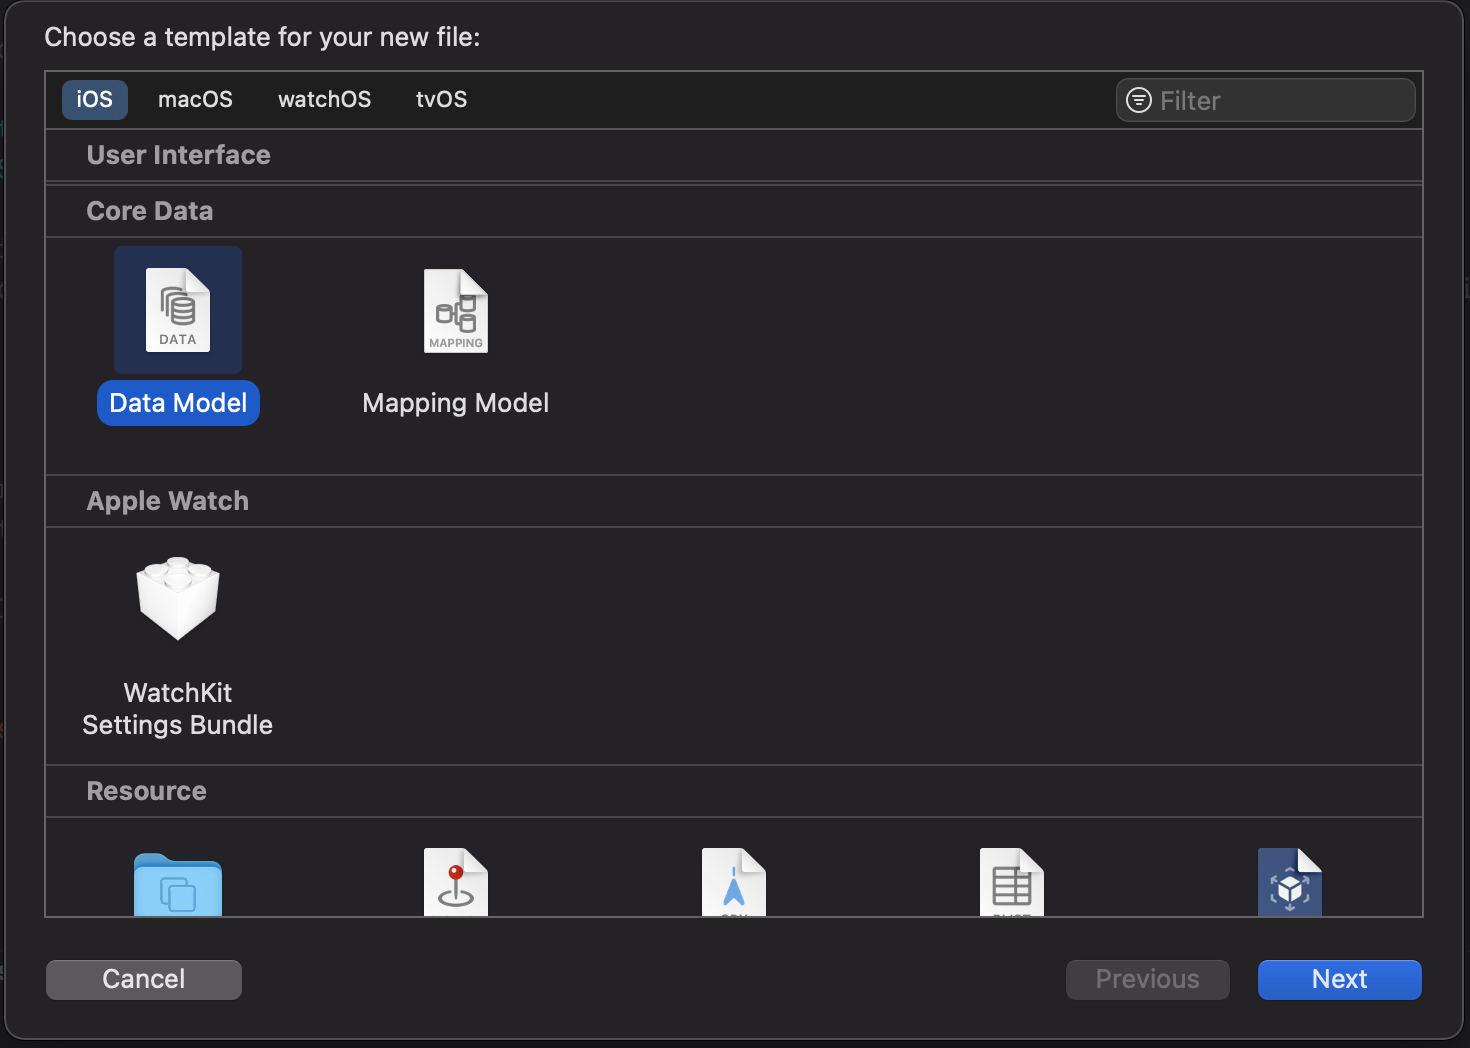
Highlight the Data Model file type and click Next. On the next page, give the file a name. It's common convention to name this after the name of your app project. So, in my case, I named my project TheContactsApp so the name I would enter on this step is TheContactsApp. Once you've changed the name, hit the Create button. You should now see your .xcdatamodel file in the Documents Outline.
Next, we are going to make the necessary updates to our AppDelegate.swift file. I'm not going to go into too much depth on this file right now. Just know this file is where we add any logic we want our app to utilize when it launches. Before adding the code shown below, be sure you import Core Data into your AppDelegate.swift file or else you will get a bunch of errors. You can do this by adding the line import CoreData right below the import UIKit line. Okay, add the following lines of code within the AppDelegate class:
// MARK: - Core Data stack

lazy var persistentContainer: NSPersistentContainer = {
    /*
     The persistent container for the application. This implementation
     creates and returns a container, having loaded the store for the
     application to it. This property is optional since there are legitimate
     error conditions that could cause the creation of the store to fail.
    */
    let container = NSPersistentContainer(name: "TheContactsApp")
    container.loadPersistentStores(completionHandler: { (storeDescription, error) in
        if let error = error as NSError? {
            // Replace this implementation with code to handle the error appropriately.
            // fatalError() causes the application to generate a crash log and terminate. You should not use this function in a shipping application, although it may be useful during development.

            /*
             Typical reasons for an error here include:
             * The parent directory does not exist, cannot be created, or disallows writing.
             * The persistent store is not accessible, due to permissions or data protection when the device is locked.
             * The device is out of space.
             * The store could not be migrated to the current model version.
             Check the error message to determine what the actual problem was.
             */
            fatalError("Unresolved error \(error), \(error.userInfo)")
        }
    })
    return container
 }()

// MARK: - Core Data Saving support

func saveContext () {
    let context = persistentContainer.viewContext
    if context.hasChanges {
        do {
            try context.save()
        } catch {
            // Replace this implementation with code to handle the error appropriately.
            // fatalError() causes the application to generate a crash log and terminate. You should not use this function in a shipping application, although it may be useful during development.
            let nserror = error as NSError
            fatalError("Unresolved error \(nserror), \(nserror.userInfo)")
        }
    }
}
The lines with the // in front of them, or any lines within the set of /* */ are called comments. Programmers use comments to explain (usually to themselves when they go back to a project six months later) what a certain section of code is doing. I highly recommend, before reading my explanation, to read through the comments in the code you just added. All this code comes directly from Apple engineers who wrote these classes. Take some time, try to understand what is going on. Can you identify the different pieces that we talked about in the Core Data Stack?
Now that you've taken the time to read through the comments yourself, let me try and give you an explanation of what is happening here. In the first line of the code we are creating a persistentContainer of type NSPersistentContainer. Remember from before what the container does for us? The container sets up the stack for us.
The next non-commented line of code, let container = NSPersistentContainer(name: "TheContactsApp"), is creating a container and naming it "TheContactsApp." This is very important, make sure this name matches exactly the name you gave to your xcdatamodel, otherwise it won't work once we start saving data.
In our next line, we are calling the loadPersistentStores method on our container. You can think of this as getting our container ready to store data. The rest of the code in this section is used for error handling if a container fails to load. We aren't going to worry about custom error handling for this project.
The last part of the code that we added is the saveContext() method. Remember how I mentioned before that a context simply manages changes that we make to our objects? Well, if we don't do anything with those changes, we are going to lose them just like we are right now. This saveContext() method ensures that any changes we make can be saved. Don't worry too much about the syntax of this method as we won't be making any changes. If it helps, you can simply think of this as being the method that saves our data to the phone.
Defining our Model
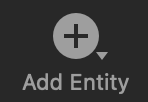
Now that we have all the necessary files, properties, and methods set. Let's create our model. Select your .xcdatamodel file. In the bottom left-hand corner you should see a button that says Add Entity:
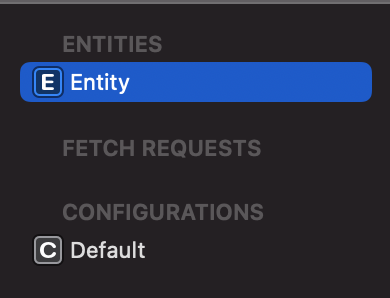
Go ahead and click this button once. You should now see that a new Entity object has appeared in the left-hand column under Entities.
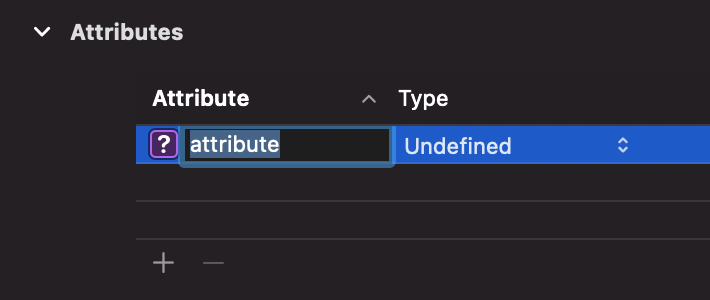
Change the name from Entity to Contact. This new object is going to represent the contacts that we are going to create and add to our list. In the center of the editor, you should see a section that says Attributes with a little + button. Click on that plus button. You should see the following:
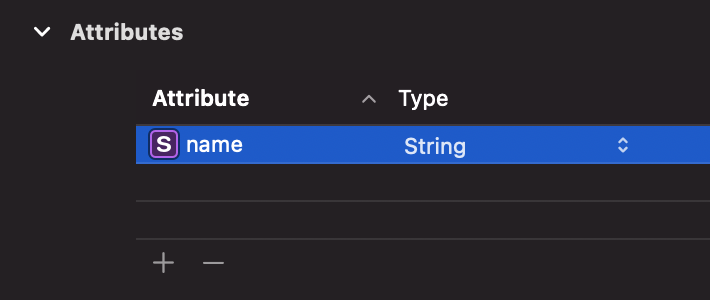
Change the highlighted attribute to name and set the type from the Type dropdown to be String. This will create a name attribute, of type string, for all of the contacts we're going to create. If done correctly, you should now see the following:
And that's it. That's all we need to do to define our model. See, that wasn't so bad, right? Next, the part everyone has been waiting for...we're finally going to persist the changes we make to our contacts list.
Persisting Contact Changes
Okay, let's start making the changes to persist our data. Go ahead and open up the ViewController.swift file. First, import CoreData at at the top of the file underneath the import UIKit line. Next, change the existing contacts array to the following:
var contacts: [Contact]?
Our contacts array is now going to house an array of contacts instead of just an array of strings. Notice the ? at the end. This tells Xcode that the value is optional, which means it might have a value, or it might not. We'll need to check later if there are values in our contacts array before we use it. Once you make that change, you should see a bunch of errors pop up, we're going to address each error one-by-one.
In the addTapped() method, we can see there is an error inside our saveAction. Go ahead and change your entire saveAction to the following:
// Create a contact object
let newContact = Contact(context: self.context)
newContact.name = nameTextField.text

// Save the data
do {
    try self.context.save()
} catch {
    print("Error trying to save")
}

// Refresh the data
self.fetchContacts()
We just changed our save action so that when it is clicked, we are going to create a contact object newContact, assign the name of that newContact to whatever the user enters in the nameTextField that we created before, save the data, then call a method (that we haven't created yet) to get all of the contacts from Core Data. Notice the structure for how we are saving our data. We use the do-try-catch structure. When we try to save the changes to our context, there is a chance that it won't work. There is a chance that it is going to throw an error. We handle any method that throws errors by marking it with try and wrapping it in the do-catch framework. Now, if there is an error when trying to save to the context, we will print an error to the console, Error trying to save. Now, let's fix the error we just created by adding our fetchContacts() method.
Add this code below your viewDidLoad() method:
func fetchContacts() {
    // Fetch the data from Core Data and display in the tableview
    do {
        let request = Contact.fetchRequest() as NSFetchRequest<Contact>

        // Sort our contacts by their name property
        let nameSort = NSSortDescriptor(key: "name", ascending: true)
        request.sortDescriptors = [nameSort]

        // Fetch our contacts from core data and set them to the contacts array
        self.contacts = try context.fetch(request)

        // Reload the data in the table view to display any changes that are made
        DispatchQueue.main.async {
            self.contactsTableView.reloadData()
        }
    } catch {
        print("Error fetching people")
    }

}
If you read the comments, you can see what we are going to do for each part of this fetchContacts() method. Notice, all of our code is wrapped inside a do-catch block like you saw earlier. We do this because we have another method that could throw an error, in this case, the fetch. Going over this function briefly, we first create our request that is going to request any objects from Core Data that are of the type Contact. Next, we are going to add some sorting for the objects that we fetch. We create the nameSort and specify that we want to sort by the name and want the sorting in ascending order. We add our nameSort to our request's sortDescriptors property. Pay attention that this is added as an array because we can have more than one sortDescriptor.
Next, and this is where we could throw an error, we are going to pass in our request to the fetch method to try and get all of our contacts. Finally, we are going to refresh the data of our contactsTableView on the main thread. If we run into any errors during the fetch, we'll enter our catch block and print to the console Error fetching people.
Now that we've created our fetchContacts() method, be sure you call it in the viewDidLoad() method, otherwise you won't see contacts when you launch the app. Add fetchContacts() anywhere in the viewDidLoad() method.
Now, let's move on and fix the remaining errors and get our app working! Scroll to the bottom of ViewController.swift. You should see three errors. Change the numberOfRowsInSection tableView method to the following:
return contacts?.count ?? 0
You've already seen a single ? and know that means the value is optional. But what on Earth is ?? supposed to be? Well, this is one method we can use to deal with optional values. This particular method is known as the nil coalescing operator and it allows us to specify a value if the contacts variable comes back nil. In this case, if we don't have any contacts, we don't want to display any rows in the table view, so we're going to specify 0 as the value.
Next, change the second row in cellForRowAt from this:
cell.textLabel?.text = contacts[indexPath.row]
to this:
cell.textLabel?.text = contacts?[indexPath.row].name
This line now says that we want to show the name for each contact that is loaded in the table view.
Finally, change the code within the if editingStyle == .delete { block to the following:
// identify the contact you want to remove
let contactToRemove = self.contacts![indexPath.row]

// remove the contact from core data's context
self.context.delete(contactToRemove)

// save the change
do {
    try self.context.save()
} catch {
    print("Error saving the deletion")
}

// get all contacts and delete the row from the table view
self.fetchContacts()
tableView.deleteRows(at: [indexPath], with: .fade)
If you read the comments, it should be straightforward what we're going to accomplish with these changes. Running through the code, we are going to:
- Find the contact that we want to remove, based on the row that we are swiping on.
- Remove the contact from core data by calling the
deletemethod and passing in ourcontactToRemove. - Save the context so our delete operation persists.
- Call the
fetchContacts()to refresh our contact list with the most up-to-date data from core data. - Delete the rows from the table view.
Go ahead and run your app. You should now be able to create some contacts, delete a few, and see that any changes you make will persist between subsequent launches of your app.
Wrap Up
Congratulations! You now have a fully functioning contacts app! I hope this series has been helpful in your iOS learning journey. You've learned so much, starting from creating your first Xcode project from scratch, all the way to implementing Core Data! While the app isn't all that fancy and has just one basic function, saving names to a list, you've learned a bunch of foundational iOS skills.
Now that you've completed the series, I encourage you to take what you've learned and build your own app. Again, doesn't have to be anything fancy. But give it a shot. Can you change this app to save a firstName and a lastName? We used the Basic style for our cells. What are some other styles you could use? What other data can you display using those other styles? Remember, Google is your friend. If you have a question about something you want to try in an app, I guarantee someone has provided an answer to that question. Keep experimenting, keep trying things out. The best way to solidify your knowledge is to practice. If you want the full source code for this project, you can check it out here.
Happy coding!


