


Welcome to Part 2!
Welcome back to the Pokédex App Series! In Part 1, I showed you the API we'll be using and how to set up your project to use a fully programmatic UI. In this post, we're going to set up our data model and start making network requests. Let's get started!
Pokemon Model
At the end of the first part in this series, we left off with an app that launches with a blue screen. We aren't going to do any of the UI work in this post, so don't worry about making any changes to your ViewController.swift file. Instead, we are going to add two new files to our project, Pokemon.swift and NetworkController.swift. First, let's add the Pokemon.swift file. To add a new file, you can use the keyboard shortcut (command + N) or can go to File -> New -> File.... Select the Swift File type and save it as Pokemon.swift. You should see a new file get added to the project.
Checking the API
Before we start writing any code, let's revisit the documentation for the PokéAPI. Like we discussed in the first post, we are going to grab a number of different fields from the API. Before we decide which fields to use, let's look at what that call looks like one more time:
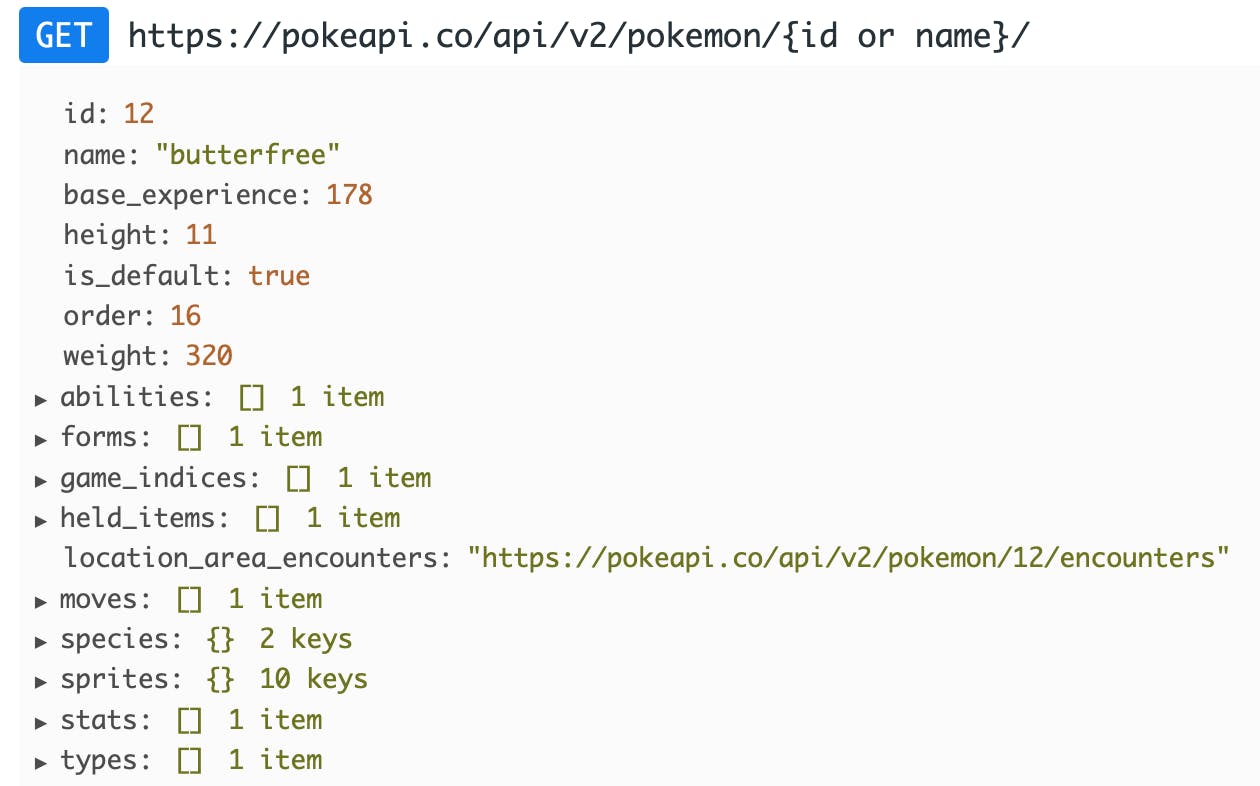
In my Making an API Request in Swift post I showed the code you can use to return the id, name, height, and weight. Getting these pieces of data are simple since they aren't nested within the JSON structure...you simply specify the exact name shown and the data type and that's all there is to it. However, for this app, we want to make it a bit more interesting by bringing in some additional information, like the abilities. So, what does that structure look like?
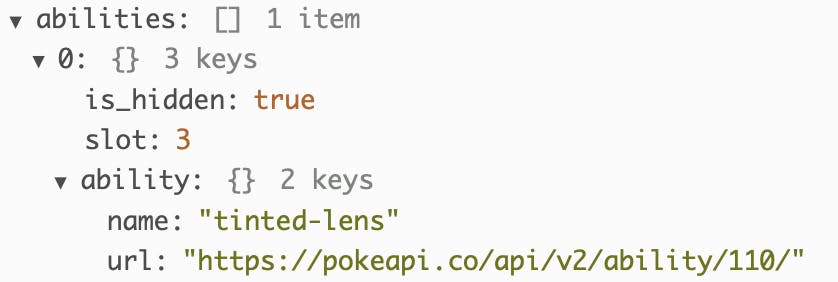
As you can see, the ability tinted-lens is nested deeper in the JSON structure. It will be our job to pull out these kinds of details. We will need to navigate through each layer of the JSON structure in order to get the details we want. In the case of abilities, what we really want is the name. To get to the name, we'll have to navigate through the abilities array. If this doesn't make much sense now, that's okay. It will become clearer once we start writing code.
Creating the Model
Inside your Pokemon.swift file, underneath the import Foundation line, add the following code:
struct Pokemon: Decodable {
    let id: Int
    let name: String
    let height: Int
    let weight: Int
}
This struct should look very familiar, as it's exactly the same to the one we used in Making an API Request in Swift. With this model, we are giving the API a place to put each of the data elements that we want returned from our request. If we were to make a request with just this model, we would only get data back for id, name, height, and weight. Not very interesting if you ask me. What we're going to do now, is add to our model so we can get the abilities of a Pokemon. Go ahead and add the following after the let weight: Int line:
let abilities: [Ability]
You'll get errors when you do this, but don't worry we'll fix them soon. What you should see is that we get an error that Xcode Cannot find type 'Ability' in scope. That makes sense, we haven't added the Ability type yet. We are creating an array of abilities to mirror what we saw in the JSON structure of the API...abilities are nested in an array. Now, we need to go one level further. Add this Ability struct underneath your Pokemon struct:
struct Ability: Decodable {
    let ability: AbilityName
}
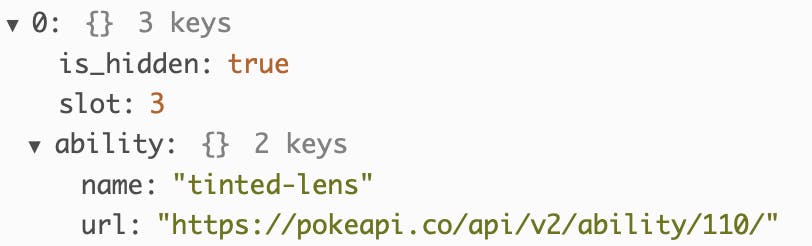
Now, you should see that your original errors go away and you get a couple more. Xcode now recognizes that we have an Ability type, but it doesn't recognize AbilityName, since we haven't created it yet. We are now one level deeper in our JSON structure. We are now inside the array at the first element:
Now, we need to go one level deeper in our JSON in order to pull out the name. Go ahead and add this AbilityName struct underneath your Ability struct:
struct AbilityName: Decodable {
    let name: String
}
You should see that all the errors go away. Finally, at this lowest level, we are pulling out the name of an ability. Your Pokemon.swift file should look like this:
import Foundation

struct Pokemon: Decodable {
    let id: Int
    let name: String
    let height: Int
    let weight: Int
    let abilities: [Ability]
}

struct Ability: Decodable {
    let ability: AbilityName
}

struct AbilityName: Decodable {
    let name: String
}
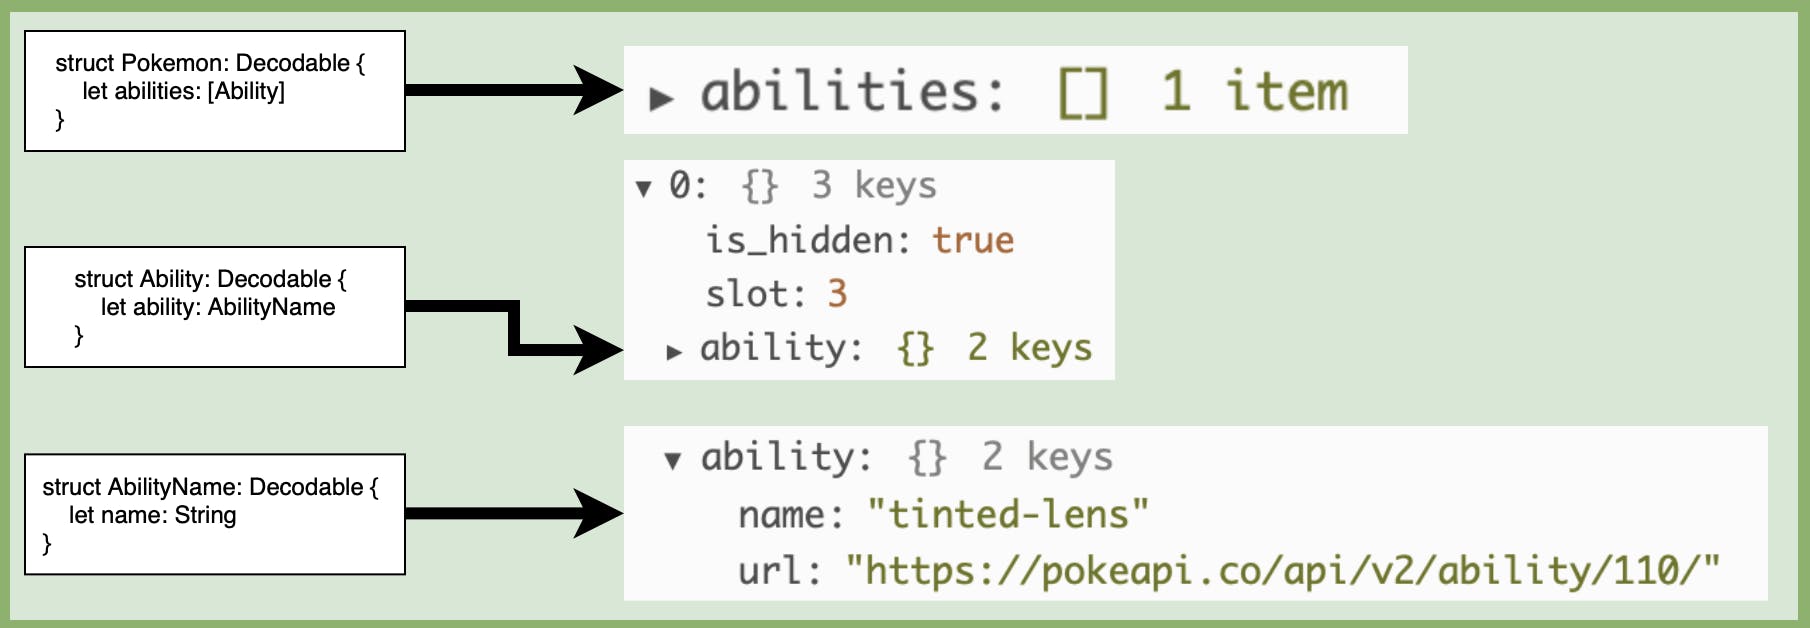
I understand this can be confusing navigating through a JSON structure. Keep in mind, with each struct we created, we navigated through another layer of the JSON. Our Pokemon struct grabs the highest level, abilities. Our Ability struct grabs one layer beneath that to get the ability dictionary. Finally, our AbilityName struct goes one layer deeper to grab the name string. Take a look at this picture for how each of the structs we created map to each of the layers in our JSON:
We'll use a very similar structure for the remaining elements we want to grab. We're going to add moves, types, and sprites to our model.
Challenge
Before you look at the solution code below, try and challenge yourself and do moves and types on your own. They follow a very similar pattern to the abilities that we just added. Go ahead and give it a shot!
Solution
Were you able to figure it out?! I hope you at least gave it a try. If you got stuck, no worries. Let's take a look at the code together. Here is how I structured my code to add moves and types:
struct Pokemon: Decodable {
    let id: Int
    let name: String
    let height: Int
    let weight: Int
    let abilities: [Ability]
    let moves: [Move]
    let types: [Type]
}

struct Ability: Decodable {
    let ability: AbilityName
}

struct AbilityName: Decodable {
    let name: String
}

struct Move: Decodable {
    let move: MoveName
}

struct MoveName: Decodable {
    let name: String
}

struct Type: Decodable {
    let type: TypeName
}

struct TypeName: Decodable {
    let name: String
}
Notice, just like with Abilities, I added arrays for moves and types, then added two structs for each to navigate through the JSON structure: Move and MoveName, Type and TypeName.
Adding the Sprites
Now, the last element I want to add is the sprites. This is going to be a little different from what we've done up to this point. Go ahead and add this line to your Pokemon struct:
let sprites: Sprite
And you should immediately see errors pop up because we haven't created a Sprite yet. Let's fix that now. Underneath your TypeName struct, add the following Sprite struct:
struct Sprite: Decodable {
    let frontDefault: URL

    enum CodingKeys: String, CodingKey {
        case frontDefault = "front_default"
    }
}
The first couple lines should be very familiar to you: Declare a new struct named Sprite that adheres to the Decodable protocol, and declare a constant frontDefault that has a type of URL. What you might not be familiar with is the CodingKeys enum. In Swift, it is common convention to use Camel Case when writing out our constants and variables. Camel case means don't capitalize the first word of your variable, then capitalize all the words that follow and don't separate with spaces. Not every language follows that convention. It is quite common that you'll run into back-end services, like the PokéAPI, that follow different convention. front_default is what's known as Snake Case. This style uses lowercase words, all separated by the underscore. Rather than break the swiftiness of our application, the developers of swift came up with the CodingKey protocol that we can use during encoding and decoding of data to match the keys used by external APIs. So, during the network call, we'll send a request for a front_default, but in our own app, we'll work with frontDefault.
Once you've added the Sprite struct, your Pokemon.swift file should look like this:
import Foundation

struct Pokemon: Decodable {
    let id: Int
    let name: String
    let height: Int
    let weight: Int
    let abilities: [Ability]
    let moves: [Move]
    let types: [Type]
    let sprites: Sprite
}

struct Ability: Decodable {
    let ability: AbilityName
}

struct AbilityName: Decodable {
    let name: String
}

struct Move: Decodable {
    let move: MoveName
}

struct MoveName: Decodable {
    let name: String
}

struct Type: Decodable {
    let type: TypeName
}

struct TypeName: Decodable {
    let name: String
}

struct Sprite: Decodable {
    let frontDefault: URL

    enum CodingKeys: String, CodingKey {
        case frontDefault = "front_default"
    }
}
Phew! That was a lot. However, we still aren't able to test if writing all this code actually worked. In order to do that, we need to create our NetworkManager class. Let's do that now.
Network Manager
Add a new file to your project and call it NetworkManager.swift. You should see a new file has been added to your project. Go ahead and add the following to your NetworkManager file:
enum HTTPMethod: String {
    case get = "GET"
}

class NetworkManager {
    static let shared = NetworkManager()

    let baseURL = URL(string: "http://poke-api.vapor.cloud/api/v2/pokemon")!
    var pokemon: Pokemon?

    func getPokemon(with searchText: String) {
        let requestURL = baseURL.appendingPathComponent(searchText)

        var request = URLRequest(url: requestURL)
        request.httpMethod = HTTPMethod.get.rawValue

        URLSession.shared.dataTask(with: request) { (data, _, error) in
            if let error = error {
                print("Error fetching pokemon: \(error)")
                return
            }

            guard let data = data else { return }

            do {
                let pokemon = try JSONDecoder().decode(Pokemon.self, from: data)
                self.pokemon = pokemon
                print(pokemon.name, pokemon.abilities, pokemon.moves)
            } catch {
                print("Error decoding Pokemon: \(error)")
                return
            }
        }.resume()
    }
}
I go into a full explanation of all this code and how it works in the Making an API Request in Swift, so if you haven't read it already, you really should! This code is virtually identical to the code in that post. The only difference is in our print statement. Instead of just printing the name, we are printing the name, abilities, and moves as a way to test that our network call is functioning. At a high level, this is the structure that network requests using URLSession follow:
- Define your URL
- Create a request using the URL
- Call the dataTask on your request
- Check for errors and abort if you get one
- Check for data and abort if you don't have any
- Decode the data to use in the app
- Resume the task and make it run
Again, if you need a more in-depth explanation, you can find it in this post.
Testing the Network Manager
Now that we've added our model and our network manager, we want to test that the code we wrote actually works! Go to your ViewController.swift file. Since we already confirmed in the first post in this series that the ViewController is presenting properly, go ahead and change this line:
view.backgroundColor = .blue
to this:
NetworkManager.shared.getPokemon(with: "pikachu")
With that change in place, run your app in the Simulator. You won't see anything on the simulator, but you should see a lot of text get printed in the console. Here is what I see printed out when I run the app:
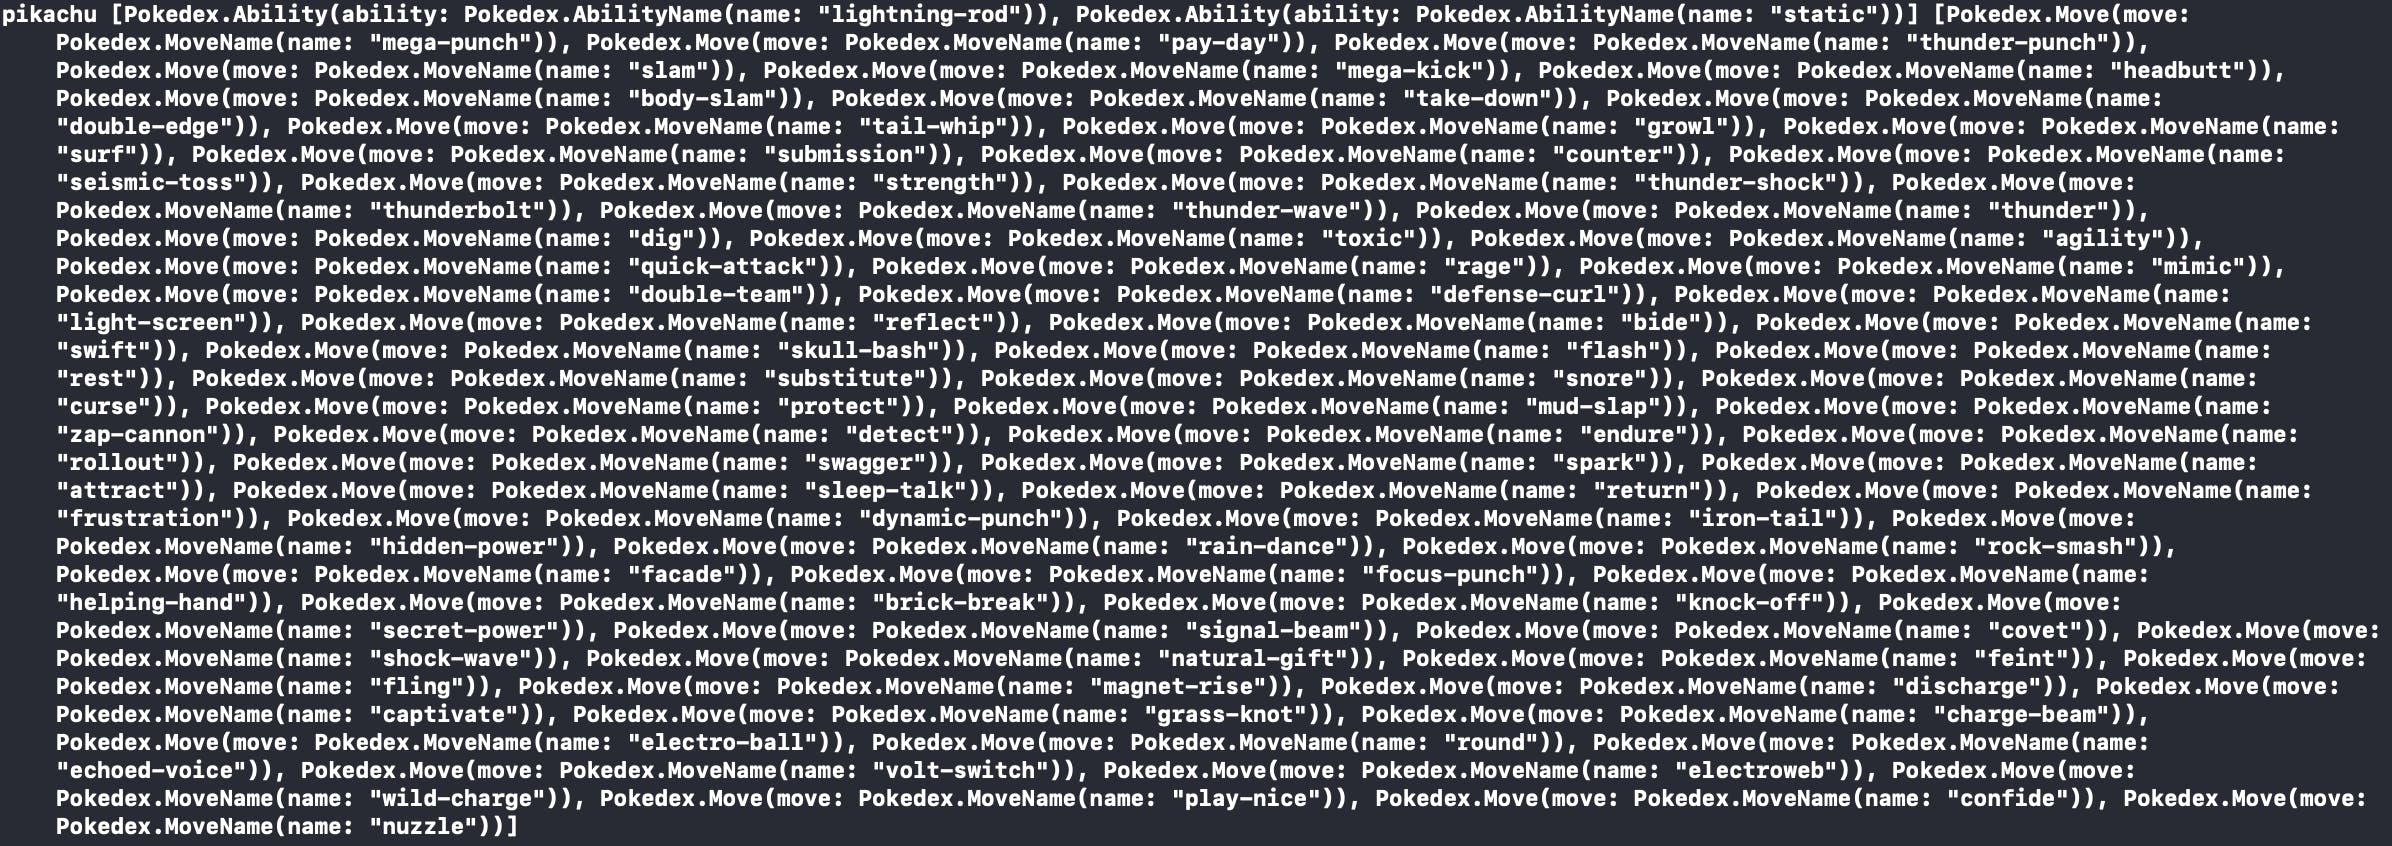
If you read through the lines printed in your console, you should see the first element printed is the name of the Pokemon (pikachu in this case), then a whole bunch of abilities and moves. Perfect! This is exactly what we wanted to see. We have now confirmed that our app is successfully communicating with the PokéAPI and returning values back to our app.
Wrap Up
That does it for this post! Take some time and go back through. If you haven't already, read through Making an API Request in Swift so you better understand what we're doing with the NetworkManager class. Spend some time reading the documentation to understand the formatting of the JSON and why we made our structs the way we did. As an experiment, try changing your Pokemon file to be like below. Does it still work? Has anything changed with how our values get printed? Give it a shot and see what happens.
Happy coding!
struct Pokemon: Decodable {
    let id: Int
    let name: String
    let height: Int
    let weight: Int
    let abilities: [Ability]
    let moves: [Move]
    let types: [Type]
    let sprites: Sprite

    struct Sprite: Decodable {
        let frontDefault: URL

        enum CodingKeys: String, CodingKey {
            case frontDefault = "front_default"
        }
    }
}

struct Ability: Decodable {
    let ability: AbilityName

    struct AbilityName: Decodable {
        let name: String
    }
}

struct Move: Decodable {
    let move: MoveName

    struct MoveName: Decodable {
        let name: String
    }
}

struct Type: Decodable {
    let type: TypeName

    struct TypeName: Decodable {
        let name: String
    }
}